How to create Bootable Flash Drive for Windows 8.1/8/7/XP and other type of OS

In olden days we all are used to burn CD/DVD to
write #Bootable Operating System. Now, nobody wants to use CD/DVD. All are dependent
with USB Flash drive. The USB Flash drive will help to use #bootableUSB instead
of bootable CD/DVD. Only we need the #ISO image of the operating system to
create the bootable flash drive. There is a tool Rufus, it is a utility that helps format and create bootable USB
flash drives, such as USB keys/pendrives, memory sticks, etc.
It
can be especially useful for cases where:
- You need to create USB installation media from bootable ISOs (Windows, Linux, UEFI, etc.)
- You need to work on a system that doesn't have an OS installed
- You need to flash a BIOS or other firmware from DOS
- You want to run a low-level utility
Requirements:
> Rufus Tool
> ISO image
> Flash Drive (Min 4GB)
> Rufus Tool
> ISO image
> Flash Drive (Min 4GB)
Steps following:
Step 1: User left double click on "rufus-1.4.9.exe (list item)"
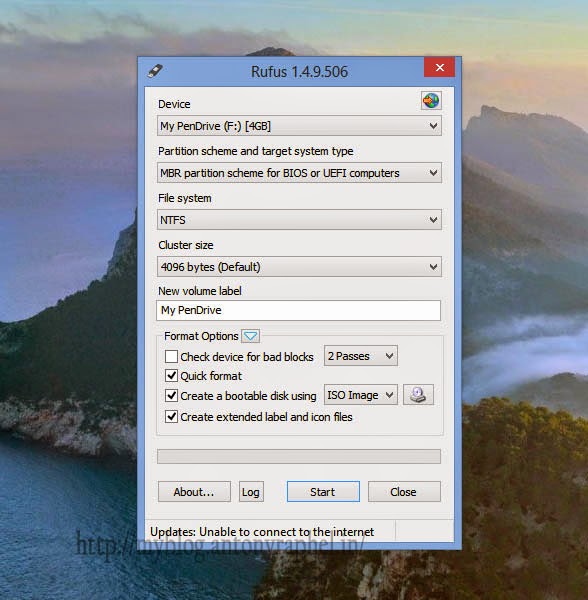
Step 2: Select "My
PenDrive (F:) [4GB] (list item)" on "Device (combo box)" in
"Rufus 1.4.9.506"
Step 3: Select "MBR partition scheme for BIOS or UEFI computers (list item)" on "Partition scheme and target system type (combo box)" in "Rufus 1.4.9.506"
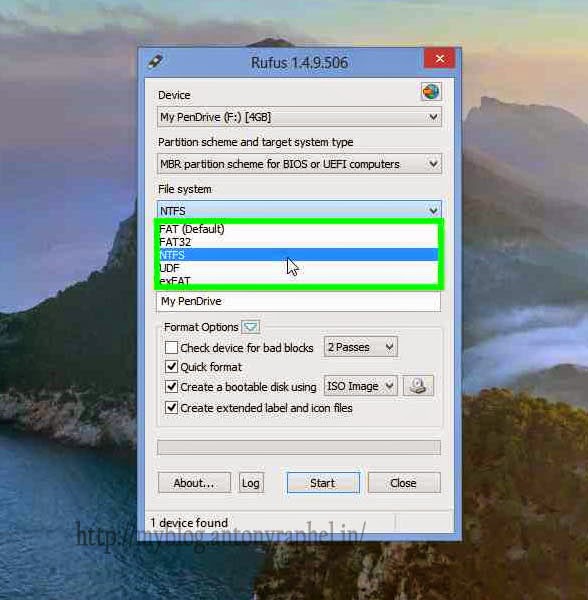
Step 4: Select "NTFS (list item)" on "File system (combo box)" in "Rufus 1.4.9.506"
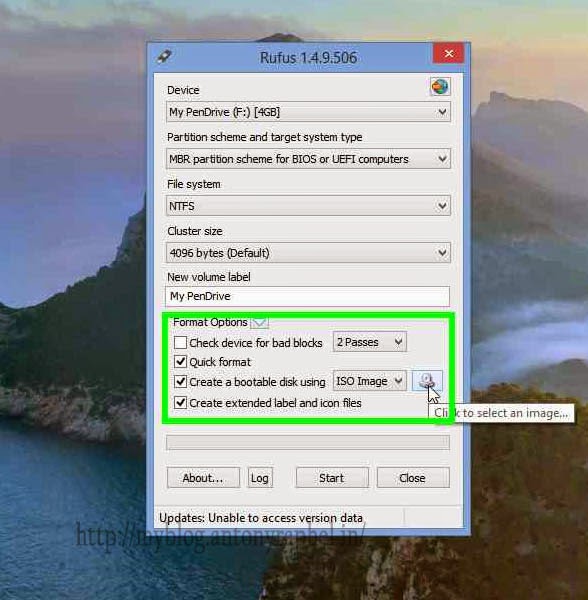
Step 5: User left click
on "ISO Image (list item)"

Step 6: User left click
on "... (Button)" in "Rufus 1.4.9.506"
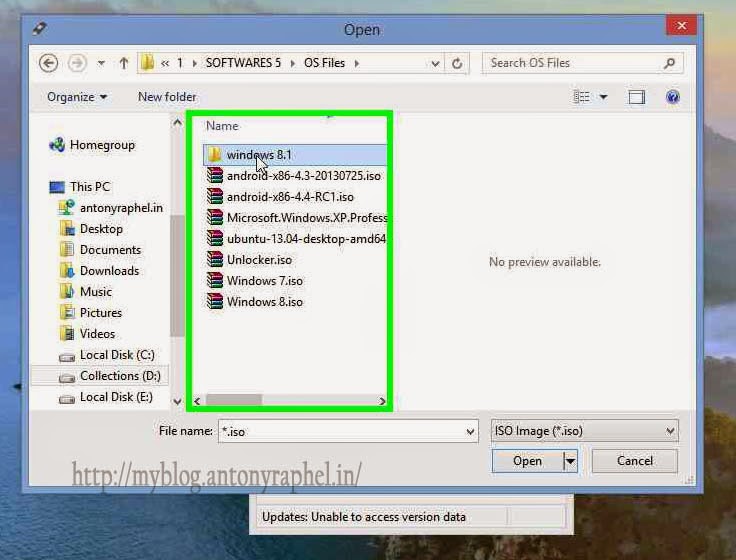
Step 7: Select correct
os that want to make bootable in "Open"
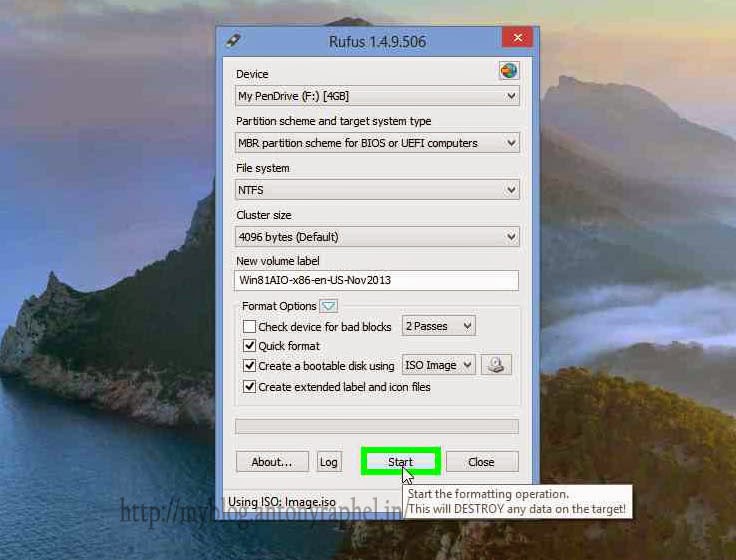
Step 8: Click on
"Start (button)" in "Rufus 1.4.9.506"
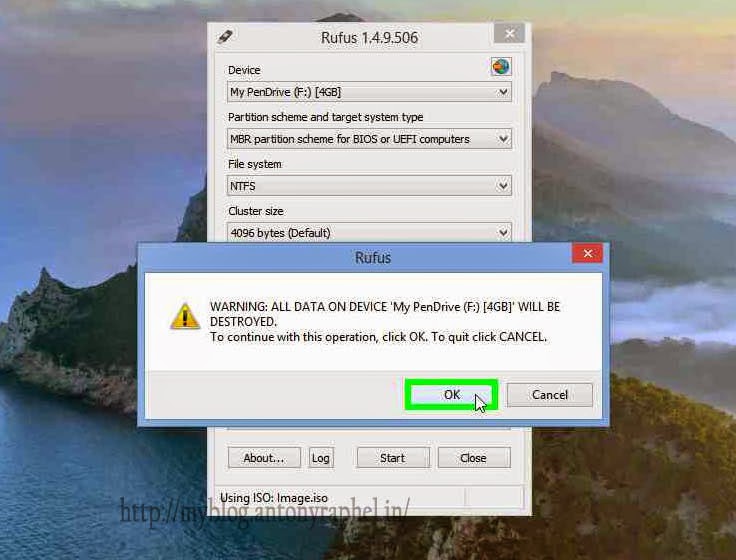
Step 9: Click on
"OK (button)" prompt message box in "Rufus"
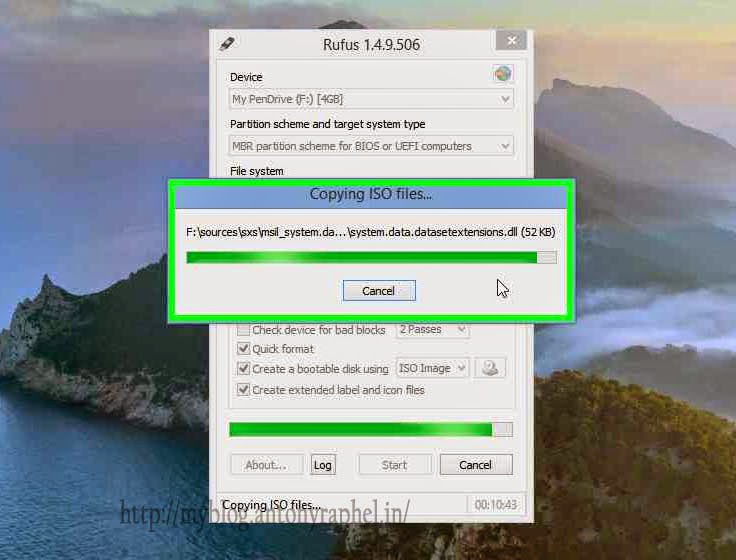
Step 10: Wait for
finish the "Copying ISO files... (Dialog box)" it will take 10-15
mins to finish copying.
Step 11: Done!
Step 12: Click on
"Close (button)" in "Rufus 1.4.9.506"
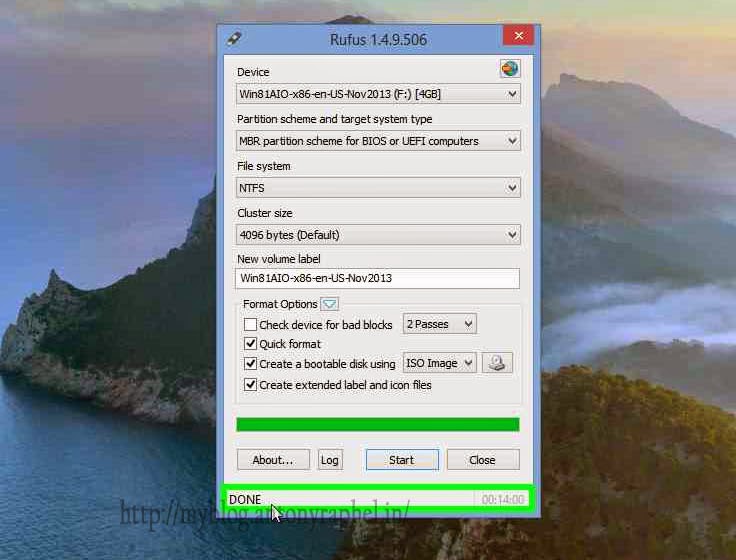
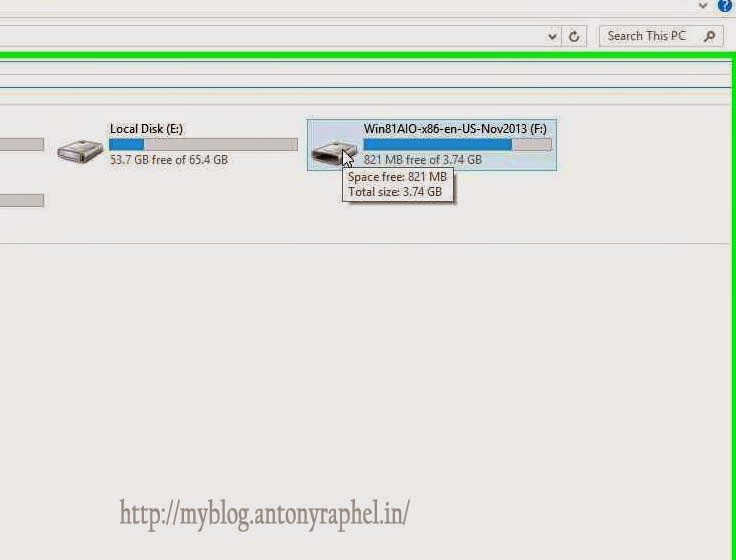
Step 13: Check the
flash drive name as "Win81AIO-x86-en-US-Nov2013 (F:) (list item)" in
"This PC" Now you can ready to use.
Download the tool from here..

Watch this video to know more...
Free Hosting Services Absolutely Free

"Free #website #hosting plans" are a type of web hosting service where you get free web
space on their hosting server to create and host your web site free. Free web
page hosting has several advantages, but mainly that it costs nothing (no money
and no credit cards needed). Free website hosting services also often have
several disadvantages (though a few actually surpass some of the cheapest paid
hosting servers in some features), such as limited web hosting features and
forced ads. Usually in exchange for these free hosting services, the free web
hosting company places advertisements on your free web pages of some sort
(banners, text links, popups, etc.) to cover their costs, and hopefully make a
profit.
However there are some free website hosts that provide free #bannerless hosting (no ads, no popups, and no advert of any kind), so they make money in
other ways, such as displaying ads for the webmaster to click in their control
panel, sending email ads, or requiring forum posting (which of course displays
ads, as well as causing you to create free website content for them). Other
free web page hosts offer very limited services (such as limited web page
space, bandwidth limit, and no scripting) to attract users and hope that many
people upgrade to a paid web hosting service. Many free website hosts provide a
sub domain or sub directory of their own domain name instead of (or an option
to) allowing its users to host their own top-level domain name free. Most of
the free web page hosting providers over the years have proven too often not be
reliable servers, but most of the free hosts listed on this web site have been
in service several years, so are more reliable than most newer free hosts.
Click here to get absolutely
free: absolutely-free-hosting
Free
,
Information
,
Tech
,
Trick
How to remove Windows Script Host Virus
 |
| Task Manager with Enable/Disable Startup |
Windows Script Host is a program installed on #Windows operating systems and some programs. It is a tool that is used to run Visual Basic Scripts (VBS), which automate some actions that are performed frequently. Unfortunately, #VBS is also used by some virus makers and hackers to perform malicious processes on your computer, but it can be removed to ensure that your computer remains protected. Removing Windows Script Host is a simple process that can be accomplished quickly and easily. Watch this video to know how to remove the VBS #virus from Windows #startup.
How to remove Windows Script Host Virus from PC by My Blog
It is better to #disable unknown or unwanted applications from Windows startup. Otherwise it will make automated malicious process. Better to delete the unwanted application like Visual Basic Scripts (VBS). To delete the Visual Basic Scripts from startup there are lot of software’s. Here am suggested to use TuneupUtilities 2014. It is safe and easy to use. In this application you can enable/disable/add/delete the startup processes.
Download AVG PC TuneUp 2015 & AntiVirus

What is ASP/BackDoor?
ASP/BackDoor is a
malicious software that once it is executed has the capability of replicating
itself and infect other files and programs. These type of malware, called
Viruses, can steal hard disk space and memory that slows down or completely
halts your PC. It can also corrupt or delete data, erase your hard drive, steal
personal information, hijack your screen and spam your contacts to spread
itself to other users. Usually, a Virus is received as an attachment on an
email or instant message.ASP/BackDoor is currently ranked 173 in the world of
online malware. If you received a pop-up warning for ASP/BackDoor while you
were surfing a website, chances are that the malware was blocked and there's
nothing to remove.
References: http://www.avgthreatlabs.com/
References: http://www.avgthreatlabs.com/
Internet Download Manager IDM 6.21 Build 2 / Patch / Serial / Activation
 |
| #InternetDownloadManager 6.21 Build 2 |
Internet download manager activation steps
Step 1: Install the
idman621build2 (Latest Version) or Oldest Version
Step 2: After the installation exit from the #IDM by click on “Show all hidden icons”
Step 2: After the installation exit from the #IDM by click on “Show all hidden icons”
Step 3: Disable the antivirus before starts patching.
Step 4: Copy the
"Patch.exe" to “C:\Program Files\Internet Download Manager” folder
Step 5: Right click on
the "Patch" and “Run as administrator” to activate.
Step
6: After patching IDM, copy the “IDMGrHlp.exe” and just go to the installation
folder of IDM “C:\Program Files\Internet
Download Manager” paste it. If the destination already has a file named “IDMGrHlp.exe”,
replace the file in the destination.
Step 7: Finished
* Note: Before starts
your activation steps, disable your anti-virus or else patch will be removed. Default
path will be “C:\Program Files\Internet Download Manager”. If you are not done
step 5 and step 6, “Internet Download Manager has been registered with a fake
serial number” annoying message was persistent. It was so annoying that it keeps
popping up until you exit IDM.
 |
| Be aware that the cracked product may work incorrectly and download files with errors |
This
patch will registered your IDM and anymore annoying popping messages. It fix’s #fake #serial popping up message. 100% tested and working properly. Get it now
from the below download button.
Latest IDM All-in-one Direct Download:
Generate Download button by click on Social Button

Watch this video will help you more to do.
#HASHCORE: Clickable Hashtags
 |
| #HASHCORE |
#HASHCORE:
Use hashtags in-content to deliver real-time social media information to your
readers. Install HASHCORE plugin, then simply add the hash symbol (#) before
any words (preferably known hashtags) such as #Xfactor and HASHCORE solution will automatically link them to their
equivalent hashtags from real-time social media sources such as Twitter.
1. How it works
#HASHCORE will provide you a
JavaScript tag that will allow our technology to run on your web site. Once HASHCORE code is installed on your site, add known hashtags to your content - Then HASHCORE
will automatically link them to their equivalent hashtags from up to date sources such as Twitter.
2. Benefits
HASHCORE provides a flexible way to enrich your #content with relevant and engaging
information.
While reading, your users will instantly have access to the most updated information related to the story. No
hyperlinks to create or manage - we do the work for you. Calling
all Bloggers and Editors! HASHCORE can bring hashtag-based news right
into your site's content.
Register
your interest via the publisher's registrationform to
start using HASHCORE on your website.
**IMPORTANT: You will FIRST need to register as a publisher,
go to #HASHCORE - sign up for FREE and
create a #HASHCORE account to get your publisher ID to activate the plugin.
#HASHCORE
,
Clickable links
,
HowTo
,
Information
,
Tech
Create a WiFi Hotspot Using the Command Prompt

It's nice to share #Wi-Fi connection to other devices. The internet connectivity has become one of the things that we need the most. This is a Wi-Fi #Hotspot creation using in CMD with Administrator privileges. We can easily create a virtual wireless adapter. For this Wi-Fi creation, no other installation required.
1.Click on start button on your desktop or press the WindowsKey on keyboard.
3.Create: Type netsh wlan set hostednetwork mode=allow ssid=Hotspotname key=Password in Command prompt. This will create a Hotspot but it is currently offline.
4.Start: Type netsh wlan start hostednetwork in command prompt to start the hotspot you just created.
5.Stop: Type netsh wlan stop hostednetwork in command prompt to stop the hotspot.
6.Internet: To share your internet connection on this hotspot go to the Network and sharing center and click on Change adapter setting. Here right click on the Connection that you use to connect to internet and select properties. In properties go to Sharing tab and check the box "Allow other network users to connect through this computer's internet connection and select the network connection name that is used by your hotspot (Microsoft Hosted Network Virtual Adapter). And save it. Now your internet connection is shared.
Note:
For more details watch the video and configure your hotspot. Below the download
link had inbuilt cmd configuration and do the step 6 to share your internet
connection.
Generate Download button by click on Social Button

Subscribe to:
Posts
(
Atom
)


.JPG)